Now that we have created the database, we want to create a table to put information in to.
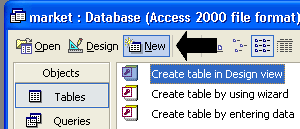
To create a new table, click the Table tab on the main window and click the New button.

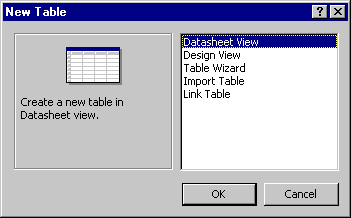
The New Table window will appear:

Here is an explanation of the five options listed.
| Option | Description |
| Datasheet View | Places you in the datasheet view with predefined fields. This method allows for direct data entry in to the table. |
| Design View | Allows you to create the fields necessary, allowing for different options to be set (name, data type, etc). |
| Table Wizard | Leads you through laid out steps that assist you to develop the new table. |
| Import Table | Import information in to the database and sets up the database according to the fields in the imported file. |
| Link Table | Link to a table that exists in a different database. |
We are going to use the Design View. Click the Design View in the list and click the OK button.
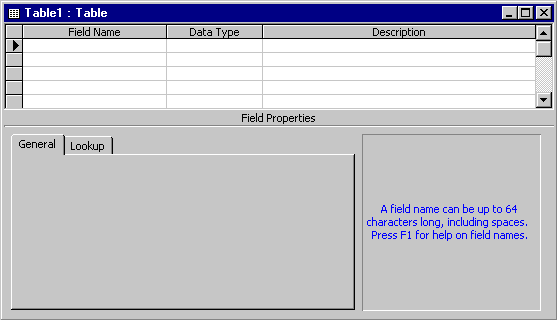
The following Design View screen will appear:

Each row in the screen represents a field that has a field name, data type and optional description.
| Item | Description |
| Field Name | Name of the field. Can have spaces. |
| Data Type | Type of data that is to be stored. Can be things like text, numbers, data/time, memo, etc. |
| Description | A description of the field. This is optional and will show in the status bar when the user is in that field on a form or in the datasheet view. |
| Primary Key | Sets the field to be a primary key (ensures that no two records contain the same value for that field). |
| Field Size | Allows you to set the size of the field (i.e. limit text entries to 10 characters). |
| Format | Format in which to display the values for the field to the users. (i.e. show a postal code with the space in the middle). |
| Decimal Places | Set the number of decimal places to show for a numeric field. |
| Input Mask | Restrict the data that the user can enter. Used to ensure correct data entry. (i.e. for a postal code, you want to make sure that the first character entered is a letter and not a number. |
| Caption | If you want a different name to appear for the column header in the datasheet view or the label in form view. (i.e. originally call field "emp#" but you want the labels to say "Employee Number" |
| Default Value | A value to be entered in to the table if the user does not enter one. |
| Validation Rule | Can be used to validate the information the user enters. (i.e. make sure the value is always less than 100) |
| Validation Text | Allows you to set the message that appears if the validation rule fails. If nothing is entered for this value, Access will display a default message. |
| Required | If turned on, the user must enter something in this field in order to save the record. |
Most of the items above are optional. If you enter nothing in them, your table will still funtion properly. Something that can not be avoided is selecting a data type. This distinguishes the type of information to be stored in the table.
| Item | Description |
| Text | A character string with a maximum length of 255 characters. |
| Memo | A character string with a maximum length of 64,000 characters. Usually used for descriptions of items (i.e. describing a truck would probably require more than 255 characters). A memo field cannot be used as a primary key. |
| Number | Various types of numbers. There are many different subtypes to select from in Field Size. They are Double (15 places, 8 bytes), Single (7 places, 4 bytes), Long Integer (-2.1 to +2.1 billion, 4 bytes, no decimals), Integer (-32 to +32 thousand, 2 bytes, no decimals) and Byte (values 0 to 255, 1 byte, no decimals). |
| AutoNumber | Access will automatically generate a number for this field. Usually used as a unique identifier for primary key purposes. |
| Yes/No | Used to store logical results from True or False results. Be careful as -1 stands for Yes and 0 stands for No. |
| Date/Time | Used for storing dates and times. The format can be changed in the Format box. |
| Currency | Used for storing numbers (not necessarily in a dollar format). Can hold 15 places to the left of the decimal and four places to the right. Takes up 4 bytes. |
| OLE Object | Used for OLE compliant applications (i.e. linking a portion of a spreadsheet to the table) |
| Hyperlink | Used for storing web addresses. |
Now that we looked at the main items in the Design View window, let's create a few of our own entries. The example we are going to use is Farmer Joe's Market.
In the table below is a list of the different fields we are going to create for our table. To create a new field, move to the Field Name in a blank row and type the field name. Even though you can have spaces in the name, we will not include any in our field names.
| Field Name | Description | Data Type | Other Information |
| ProductID | uniques number for each product | autonumber | will be primary key |
| ProductName | Name of the product. | Text | Field Size of 30 |
| Category | Category product falls in. | Text | Field Size of 20 |
| Distributor | Company where we buy the product. | Text | Field Size of 50 |
| CostPrice | Price we buy product for. | Currency | |
| MarkUp | Amount we increase the price from cost. | Number | Field Size of Single |
| QuantityInStock | Number of units in stock. | Number | Field Size of Single |
We want the ProductID to be our primary key as we may have products with the exact same name as another. To set the ProductID as the primary key:
Now that we have all the fields entered in the table, we have to save the table. To save the table:

Click the OK button.
To close the table, click
the ![]() button or select File,
Close from the menu.
button or select File,
Close from the menu.
In the Access main window, you should see an entry called "Products" under the Table section. To enter values in the table, click the table name (tblProducts) and click the Open button or double click on the table name . The datasheet view will open. It looks like a spreadsheet-like format.
Each row represents one record and each column represents the specific field. Here is a list of keys for entering values:
| Key | Description |
| Tab | Moves to the next field to the right. If you are in the last field for the record, when the Tab key is pressed, it will move you to the next record below. |
| Shift - Tab | Moves to the next field to the left. If you are in the first field for the record, it will move you to the next record above the current record. |
| Arrow Keys | Moves in the direction of the key pressed. |
| Enter | Moves to the next field to the right. If you are in the last field for the record, it will move you to the next record below the current record. |
Whenever you leave the current record (the row you are one), the record will be saved. Ex. If you are in the fourth field and make a change, if you hit the Tab key, it will move to the next field to the right, but does not save the record. If you press the Up or Down arrow key, this will move to a different record and the changes to the current record will be saved.
Here is a list the entries to enter: You will not need to add anything into the ProductID field as it is an autonumber field and will automatically add a number.
ProductName |
Category |
Distributor |
CostPrice |
MarkUp |
QuantityInStock |
Apples |
Fruit |
Eatery Fruits |
$0.25 |
0.33 |
65 |
Coke |
Pop |
Coca-Cola Ltd. |
$0.93 |
0.15 |
64 |
Dad's Oatmeal |
Cookies |
Dad's Cookies Ltd. |
$3.47 |
0.3 |
22 |
Diet Coke |
Pop |
Coca-Cola Ltd. |
$0.93 |
0.15 |
24 |
Diet Pepsi |
Pop |
PepsiCo Ltd. |
$0.88 |
0.15 |
33 |
Double Fudge |
Cookies |
Nabisco Ltd. |
$2.57 |
0.22 |
15 |
Fruit Loops |
Cereal |
Kellogs Ltd. |
$3.58 |
0.25 |
40 |
HoneyCombs |
Cereal |
Post Ltd. |
$3.14 |
0.23 |
33 |
Oranges |
Fuit |
Eatery Fruits |
$0.30 |
0.25 |
40 |
Oreo |
Cookies |
Christie Ltd. |
$2.30 |
0.18 |
20 |
Pepsi |
Pop |
PepsiCo Ltd. |
$0.87 |
0.15 |
79 |
Rice Kripsies |
Cereal |
Kellogs Ltd. |
$3.97 |
0.17 |
45 |
To close the table, click the ![]() button or select File,
Close from the menu.
button or select File,
Close from the menu.