Section 1
:: Intro
:: DW Interface
:: Defining
a site
:: New Document
Section 2
:: Inserting and formatting text
:: Bullets and Lists
:: Hyperlinks
Section 3
:: Tables
:: Images
Section 4
:: flash buttons
:: Resizing Elements
:: horizontal Rules
Section 5
:: Behaviours and Interactivity
:: Roll Overs
Section 6
:: CSS
:: Frames
Section 7
:: Templates
:: Library Items
:: Uploading to a Web Server
:: Keyboard Shortcuts
Dreamweaver 8 Notes- Section 3 |
Section 1 |
Tables
Create and modify a table in Standard view
Standard view is the typical Dreamweaver design view. To create a table in Standard view, you use the Insert Table command. Dreamweaver creates a table based on options you select in the Insert Table dialog box. You can easily modify the initial table structure to create more complex design by merging and splitting cells, and by inserting rows and columns.
You use the table cells to control the placement of text and images in a web page.
Insert a table
In the Document window, place the insertion point in the document, then do one of the following:
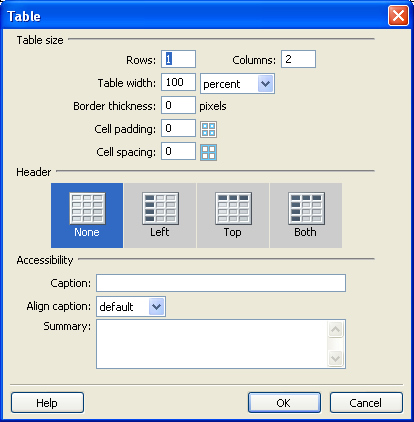
- Select Insert - Table.
- In the Insert bar's Common category, click the Table icon. The Insert Table dialog box appears.
Adding and removing rows and columns
To add and remove rows and columns, use the commands in the Modify - Table submenu. or right click within a cell and choose the table menu which appears
Note: Pressing Tab in the last cell of a table automatically adds another row to the table.
To add rows or columns:
- Click in a cell and do one of the following:
- To add a row above the current cell, choose Modify - Table - Insert Row.
- To add a column to the left of the current cell, choose Modify - Table - Insert Column.
- To add multiple rows or columns at once, or to add a row below the current cell or a column to the right of it, choose Modify - Table - Insert Rows or Columns.
- If you chose Insert Rows or Columns, enter the necessary information in the dialog box, then click OK.
To delete a row or column:
- Click in a cell within the row or column you want to delete and do one of
the folllowing:
- To delete a row or column, choose Modify - Table - Delete Row / Column.
Note: Alternatively, you can select a complete row or column and then choose Edit > Clear or press Delete; the entire row or column is removed from the table.
To add or delete rows or columns using the Property inspector:
Select the entire table and in the Property Inspector, and increase or decrease the Rows value to add or delete rows. Dreamweaver adds and removes rows at the bottom of the table.
Or increase or decrease the Cols value to add or delete columns. Dreamweaver adds and removes columns at the right side of the table.
Note: Dreamweaver does not warn you if you are deleting rows and columns that contain data.
Splitting and merging cells
Use the Property inspector or the commands in the Modify - Table submenu to split or merge cells. You can merge any number of adjacent cells-as long as the entire selection is a line or a rectangle of cells-to produce a single cell that spans several columns or rows. You can split a cell into any number of rows or columns, regardless of whether it was previously merged. Dreamweaver automatically restructures the table (adding any necessary COLSPAN or ROWSPAN attributes) to create the specified arrangement.
To merge two or more cells in a table:
- Select the cells. The selected cells must be contiguous and in the shape of a rectangle.
- Choose Modify - Table - Merge Cells, or click the Merge Cells button in the Property inspector. The contents of the individual cells are placed in the resulting merged cell. The properties of the first cell selected are applied to the merged cell.
To split a cell:
Add color to a table
You can add color to any part of a table. To add colour to the background:
- In the document, click in any cell of the table, then in the tag selector located at the bottom left of the Document window, click the <table> tag to select the entire table.
- Properties for the selected table appear in the Property inspector.
- In the Property inspector, in the Bg Color text box select a color by
doing one of the following:
- Click the color picker pop-up, then choose a color from the color picker.
- Enter a color using a hexadecimal value, for example #CC9933.
- Enter a web-safe color name, such as yellow.
- You can apply a background color to the cells of the table the same way. Click in the top-left cell, then in the Property inspector, select a different color in the Bg Color text box.
Add a border color
Border color applies to both the outside and inside borders of a table.
- In the Document window, select the table.
- In the Property inspector, in the Brdr Color text box, use the color picker to select a border color for your table.
Set a relative width table in Standard view
A percentage-based table stretches and shrinks based on the width of a browser window. (For example if you specify that a table uses a width of 75%, the table stretches to fill 75% of the horizontal space regardless of the browser window size. This can be useful in some instances, such as making sure a navigation menu is always displayed when a window is resized.
When you want to set the size of a table regardless of how a user resizes the browser window, use pixel-based tables. When you want the table to stretch to the size of the browser window, percentage-based tables are best.
Adding content to a table cell
You can add text and images to table cells the same way that you add text and images outside of a table.
To move from one cell to another using the keyboard, do any of the following:
- Press Tab to move to the next cell. Pressing Tab in the last cell of a table automatically adds another row to the table.
- Press Shift+Tab to move to the previous cell.
- Press the arrow keys to move up, down, left, or right.
Selecting table elements
You can select an entire table, row, or column at once. You can also select a contiguous block of cells within a table.
You can also select multiple nonadjacent cells in a table and modify the properties of those cells. You cannot copy or paste sets of nonadjacent cells.
To select an entire table, do one of the following:
- Click the upper left corner of the table or click anywhere on the right or bottom edge.
- Click in a table cell, and then select the table tag in the tag selector at the lower left corner of the Document window.
- Click in a table cell, and then choose Modify - Table - Select Table.
Selection handles appear on the selected table's lower and right edges.
To select rows or columns:
To select a single cell, do one of the following:
Click in the cell, and then select the <td> tag in the tag selector at the lower left corner of the Document window. Click in the cell, and then choose Edit - Select All.Note: Choose Edit - Select All again when a cell is selected to select the entire table.
To select nonadjacent cells:
Control-click the cells, rows, or columns you want to select.
About conflicts in table formatting
When formatting tables in Design view, you can set properties for the entire table or for selected rows, columns, or cells in the table. When a property, such as background color or alignment, is set to one value for the whole table and another value for individual cells, cell formatting takes precedence over row formatting, which in turn takes precedence over table formatting.
The order of precedence for table formatting is:
- Cells
- Rows
- Table
For example, if you set the background color for a single cell to blue, and then set the background color of the entire table to yellow, the blue cell does not change to yellow, since cell formatting takes precedence over table formatting.
Using a design scheme to format a table
Use the Format Table command to quickly apply a preset design to a table. You can then select options to further customize the design.
Note: Only simple tables can be formatted using preset designs. You can't use these designs to format tables that contain merged cells (colspan or rowspan), column groups, or other unusual formatting that keeps the table from being a simple rectangular grid of cells.
To use a preset table design:
- Select a table, and then choose Commands - Format Table. The Format Table dialog box appears. Customize options as desired.
- Click Apply or OK to format your table with the selected design.
Setting table properties
This Property inspector allows you to set properties for tables.
To set table properties:
- Table Id is an ID for the table.
- Rows and Cols are the number of rows and columns in the table.
- W and H are the width and height of the table in pixels, or as a percentage of the browser window's width.
- CellPad is the number of pixels between a cell's content and the cell boundaries.
- CellSpace is the number of pixels between adjacent table cells. When you don't explicitly assign values for cell spacing and cell padding, most browsers display the table as if cell padding were set to 1 and cell spacing were set to 2. To ensure that browsers display the table with no padding or spacing, set Cell Padding and Cell Spacing to 0.
- Align determines where the table appears, relative to other elements in the same paragraph such as text or images. Left aligns the table to the left of other elements (so that text in the same paragraph wraps around the table to the right); Right aligns the table to the right of other elements (with text wrapping around it to the left); and Center centers the table (with text appearing above and/or below the table). Default indicates that the browser should use its default alignment. When alignment is set to Default, other content is not displayed next to the table. To display a table next to other content, use Left or Right alignment.
- Border specifies the width, in pixels, of the table's borders. Tip: When you don't explicitly assign a value for border, most browsers display the table as if the border were set to 1. To ensure that browsers display the table with no border, set Border to 0.
- Clear Column Widths and Clear Row Heights buttons delete all explicitly specified row height or column width values from the table.
- Convert Table Widths to Pixels and Convert Table Heights to Pixels buttons set the width or height of each column in the table to its current width in pixels (also sets the width of the whole table to its current width in pixels).
- Convert Table Widths to Percent and Convert Table Heights to Percent buttons set the width or height of each column in the table to its current width expressed as a percentage of the Document window's width (also sets the width of the whole table to its current width as a percentage of the Document window's width).
- Bg Color is the table's background color.
- Brdr Color is the color for the table's borders.
- Bg Image is the table's background image.
Nesting tables
A nested table is a table inside a cell of another table. You can format a nested table as you would any other table; however, its width is limited by the width of the cell in which it appears.
To nest a table within a table cell:
- Click in a cell of the existing table.
- Choose Insert - Table.
- In the Insert Table dialog box, specify the desired properties for the nested table, then click OK.
Images
Modern Web browsers all support graphic images in GIF or JPEG format.
GIF - Use when your image has large areas of solid color and no color blending. GIF images are saved in 8-bit color mode, which limits them to 256 colors.
JPEG - Use when your images are photographs or when the image contains a large color tonal range. JPEG images are saved in 24-bit color mode and can contain millions of colors.
Both image formats are saved as compressed files, creating a small file which downloads quickly when the page is loaded.
Dreamweaver allows you to choose how it will reference your images.
Document-relative referencing constructs the path to the image based on the relative location of your HTML document to the graphics file. Use this for hyperlinks and paths.
Site-root-relative referencing constructs the path to the image based on the relative location of the image from your site root. Use this for very large sites or if you will be moving pages frequently within the server.
When you insert an image into a Dreamweaver document, Dreamweaver automatically generates a reference to the image file in the HTML source code. To ensure that this reference is correct, the image file must be in the current site. If it is not in the current site, Dreamweaver asks whether you want to copy the file into the site.
To insert an image:
- Place the insertion point where you want the image to appear in the
Document window, then do one of the following:
- In the Common category of the Insert bar, click the Image icon, drag the Image icon to the Document window (or to the Code view window if you are working in the code).
- Choose Insert - Image.
- Drag an image from the Assets panel (Window > Assets) to the desired location in the Document window; then skip to step 3.
- Drag an image from the Site panel to the desired location in the Document window; then skip to step 3.
- Drag an image from the desktop to the desired location in the Document window; then skip to step 3.
- In the dialog box that appears, do one of the following:
- Choose File System to choose a graphic file.
- Choose Data Source to choose a dynamic image source.
- Browse to choose the image or content source you want to insert. If you are working in an unsaved document, Dreamweaver generates a file:// reference to the image file. When you save the document anywhere in the site, Dreamweaver converts the reference to a document-relative path.
- In the Property inspector (Window > Properties), set properties for the image.
Aligning an image
Use the image Property inspector to set the alignment of an image in relation to other elements in the same paragraph or line.
Note: HTML does not provide a way to wrap text around the contours of an image, as you can with some word processing applications You can align an image to text, another image, a plug-in, or other elements in the same line. You can also use the alignment buttons (left, right, and center) to set the horizontal alignment of an image.
Default generally specifies a baseline alignment. (The default may vary depending on the site visitor's browser.)
Baseline and Bottom align the baseline of the text (or other element in the same paragraph) to the bottom of the selected object.
Top aligns the top of an image to the top of the tallest item (image or text) in the current line.
Middle aligns the middle of the image with the baseline of the current line.
TextTop aligns the top of the image with the top of the tallest character in the text line.
Absolute Middle aligns the middle of the image with the middle of the text in the current line.
Absolute Bottom aligns to the bottom of the image with the bottom of the line of text (which includes descenders, as in the letter g).
Left places the selected image on the left margin, wrapping text around it to the right. If left-aligned text precedes the object on the line, it generally forces left-aligned objects to wrap to a new line.
Right places the image on the right margin, wrapping text around the object to the left. If right-aligned text precedes the object on the line, it generally forces right-aligned objects to wrap to a new line.
Resizing an image
You can visually resize elements such as images, plug-ins, Macromedia Shockwave or Flash movies, applets, and ActiveX controls in the Design View of the Dreamweaver Document window. Visual resizing helps you determine how an element affects the layout at different dimensions.
Resizing changes the width and height attributes of the element back to their original size. The W and H fields in the Property inspector display the current width and height of the element as you resize it. The element's file size does not change.