Section 1
:: Intro
:: DW Interface
:: Defining
a site
:: New Document
Section 2
:: Inserting and formatting text
:: Bullets and Lists
:: Hyperlinks
Section 3
:: Tables
:: Images
Section 4
:: flash buttons
:: Resizing Elements
:: horizontal Rules
Section 5
:: Behaviours and Interactivity
:: Roll Overs
Section 6
:: CSS
:: Frames
Section 7
:: Templates
:: Library Items
:: Uploading to a Web Server
:: Keyboard Shortcuts
Dreamweaver 8 Notes -Section 7:: Templates :: Library Items :: Uploading and FTP :: Keyboard short cuts :: |
Section 1 |
Templates
A Dreamweaver template is a special type of document that you use to design a "locked" page layout. A template author designs the page layout, and creates regions in the template that are editable in documents that are based on a template. In a template, the designer controls which page elements a template user- such as writers, graphic artists, or other web developers- can edit. One of the most powerful uses of templates is the ability to update multiple pages at once. A document that is created from a template remains connected to that template (unless you detach the document later). You can modify a template and immediately update the design in all document based on it. You can add a Cascading Style Sheet (CSS), timeline, or behavior to a document that is based on a template, because Dreamweaver automatically inserts an editable region in the head section of a document. Template-related operations (such as adding editable regions) are enabled in both Code view and Design view. Some template customizing options are only available in Code view. A template determines the basic structure for a document and contains elements such as text, images, page layout, styles, and editable regions. You can create a template from a new document or from an existing document. If you insert a template region in a document that hasn't been saved as a template, Dreamweaver advises you that the document will automatically be saved as a template.To create a template:
- Open the document you want to save as a template in the Document window,
by doing one of the following:
- To open an existing document, choose File - Open and select the document.
- To open a new blank document, choose File - New. In the dialog box that opens, choose Basic Pages or Dynamic pages. In the document list select the type of page you want to work with, then click Create.
- When the document opens, choose File - Save as Template.
Note: Unless you selected Don't Show This Dialog Again, you'll receive a warning that says the document you're saving has no editable regions. Click OK to save the document as a template, or click Cancel to exit this dialog box without creating a template.
- In the dialog box that appears, select a site to save the template in from the Site pop-up menu, and enter a unique name for the template in the Save As text box.
- Click Save.
- The template file is saved in the site's Templates folder, with a .dwt filename extension.
Dreamweaver automatically locks most regions of a document when you save the document as a template. As a template author you define which regions of a template-based document will be editable by inserting editable regions or editable parameters in the template. As you create the template, you can make changes to both editable and locked regions. In a document based on the template, however, a template user can make changes only in the editable regions; the locked regions can't be modified.
There are four types of template regions: editable regions, repeating regions, optional regions, and editable tag attributes.
An editable region is an unlocked region in a template-based document; a section a template user can edit. A template author can define any area of a template as editable.
For a template to be effective, it should contain at least one editable region; otherwise, pages based on the template can't be edited.
Before you insert an editable region, you should save the document you are working in as a template. If you insert an editable region in a document rather than a template file, Dreamweaver warns you that the document will automatically be saved as a template.
To define an editable template region:
- In the Document window, do one of the following to select the region:
- Select the text or content that you want to set as an editable region.
- Place the insertion point where you want to insert an editable
region.
- Do one of the following to insert an editable region:
- Choose Insert - Template Objects - New Editable Region.
- Right-click the selected text or object, and choose New Editable Region from the context menu.
- In the Insert bar, select Templates, then click the Editable Region button.
- The Editable Region dialog box appears.
- In the Name text box, enter a unique name for the region. (You cannot use
the same name for more than one editable region in a particular template.)
Note: Do not use special characters in the Name field.
- Click OK.
The editable region is enclosed in a highlighted rectangular outline in the template, using the highlighting color that is set in preferences.
A tab at the upper-left corner of the region shows the name of the region. If you inserted an empty editable region in the document, the name of the region also appears inside the region.
Removing an editable region
If you've marked a region of your template file as editable and you want to lock it (make it noneditable) again, use the Remove Template Markup command. >Note: You can't lock a region in a file based on a template; you can lock a region only in a template file.To remove an editable region:
- In the document or in the tag selector, select the editable region you want to change.
- Choose Modify - Templates - Remove Template Markup.
The region is now no longer editable.
Repeating Editable Regions
A repeating region is a section in a document that is set to repeat. For example, you can repeat a table row. By repeating the table row, you allow the template user to create an expanding list, while keeping the design under the control of the template author. In a document based on the template you use repeat region control options to add or delete copies of the repeated region. There are two types of repeating regions you can insert in a template-repeating region and repeating table.To insert a repeating region in a template:
- In the Document window, do one of the following:
- Select the text or content you want to set as a repeating region.
- Place the insertion point in the document where you want to insert the
repeating region.
- Do one of the following, to create a repeating region:
- Choose Insert - Template Objects - Repeating Region.
- Right-click -the selected content, and choose New Repeating Region from the context menu.
- In the Templates category of the Insert bar, click the Repeating Region
button.
The Repeating Region dialog box appears.
- In the Name text box, enter a unique name for the template region. (You
cannot use the same name for more than one repeating region in a template.)
Note: When you name a region, do not use special characters.
- Click OK.
The repeating region is inserted in the document.
Note: A repeating region isn't editable in the template-based document, unless it contains an editable region.
To insert a repeating table:
- In the Document window, place the insertion point in the document where you want to insert the repeating table.
- Do one of the following:
- Choose Insert - Template Objects - New Repeating Table.
- Right-click the selected content, and choose New Repeating Table from the context menu.
- In the Templates category of the Insert bar, click the Repeating Table
button.
The Repeating Table dialog box appears.
Enter new values as desired.
- Click OK.
Defining editable tag attributes
You use the Make Attribute Editable command to allow a template user to modify specified tag attributes in a document created from a template. For example, you can set a background color in the template document yet allow a template user to set a different background color for pages they create. The user can update only the attributes you define as editable. Creating an editable tag attribute inserts a template parameter in the code. An initial value for the attribute is set in the template document; when a template-based document is created, it inherits the parameter. A template user can then edit the parameter in the document. The following data types are supported: text, boolean (true/false), color, and URL.Creating a template-based document
Once you set the template design, you apply a template to either a blank document or a document that already contains content. To create a new document based on a template, you can use the Assets panel or the New Document dialog box. The Assets panel lists templates in your current Dreamweaver site. You can right-click in the Templates category of the Assets panel to create a new template, and to create new documents from a template. In the New Document dialog box, you can select a template from any of your currently defined Dreamweaver sites to create a new document from. When you create a new document based on a template, you can choose whether the document remains attached to the template. By default, when you change a template, all attached documents update to reflect the template changes. If you deselect the Update Page When Template Changes option when creating a new document, the new document is created as stationery: an independent HTML file, with no template regions. Updates to the template do not change the document.To create a template-based document in the New Document dialog box:
- Choose File - New to open the New Document dialog box.
- In the New Document dialog box, select the Templates tab.
- In the Templates For list, select the site which contains the template you
want to use.
The site templates list updates to display templates in the selected site.
- In the list, select the template you want to use.
- Click Create to create a new template-based page.
The document opens in the Document window.
Editing content in a template-based page
You can easily identify and select template regions in both the template document and in template-based documents. Editable template regions are listed at the bottom of the Modify - Templates submenu. Editable regions that are inside a repeated region do not appear in the menu. You must locate these regions by looking for tabbed borders in the Document window.To find an editable region and select it in the document:
Choose Modify - Templates, and choose the name of the region from the list at the bottom of that submenu. The editable region is selected in the document.Creating Libraries
Templates act as blueprints for a Dreamweaver document and work well when pages share common items such as a logo, the header, or the copyright and 'Last edited date' statement of the organisation. However. if these elements must be presented at different locations and in different combinations on the Web pages templates alone do not work. Templates represent a similar structure for all the pages of a site. In Dreamwaever such pages can be created with the use of library items. A library item can contain objects, such as text, images, tables and forms that can be used across Web pages in a site. When a library item is updated it is automatically updated in an documents containing the library item.Library Items
The Library category of the Asset panel is used to create new library items - Window - Assets. The library items are stored in the root folder of the site and have a .lbi extension. To create a library item:- Window - Assets - click on the last icon on the left hand side.
- Select the element of the document that will be a library item.
- Modify - Library - Add Object to Library to add the selected object.
- Enter a name for the library item in the bottom pane of the panel.
Inserting library items
Library items can be inserted into a site to give the site a consistent look. To insert a library item into a document:- Open the document in which the library item is to be inserted.
- Open the Library category of the Asset panel.
- Select the Library item that is to be inserted.
- Click the Insert button in the lower left corner of the panel to insert the library item into the document.
Modifying library items
When a library item is modified all pages that contain the item are automatically updated. To modify a library item:- Select the library item from the panel.
- Click the Open Library Item button on the panel to open the Library Item window.
- Modify the library item and save the changes in the file.
- The Update Library Items dialog box appears and asks if you want to update all documents in the site that use this item.
- Click Update to update all the pages that use the item.
- The Update Pages dialog box appears. It shows all the updated files.
Uploading file to a webserver
You need web space!!!
- You could use the free space associated with your ISP account. To find out more check your ISP’s help pages.
- You could purchase a domain name and web hosting space. (you can not host a domain name on free space. If you purchase a domain name you do not have to purchase Web hosting you could just keep it and not use it or use just for email purposes.)
- Use free space available from a free web host.
How you get your web pages to the Internet will depend on how your web host (the site where you are going to place your web pages). Some web hosting servers will allow you to upload your files via web pages. Other hosts will require that you use an FTP program. The FTP method is the easiest. FTP stands for File Transfer Protocol and there are many free FTP programs but we are going to use Dreamweaver as our FTP program.
No matter what program you use you need to know your
FTP address
user or account name
password
Note: it is imporetant to find out what your home page is to be called on their system. It could be default.htm or index.htm or something else.
setting up FTP connections
Here we will use Dreamweaver’s FTP facility.
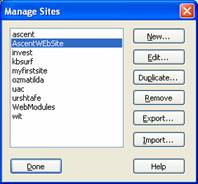
| Firstly you need to edit your site definition so open Dreamweaver and define a new site or open your site then click SITE--MANAGE SITES Then click on your site definition and then EDIT or click NEW then Site |
|
| Go through the site definition as normal until you get to the screen where it says “How do you connect to your remote server?” we usually select None from the drop down box as per the example to the right | 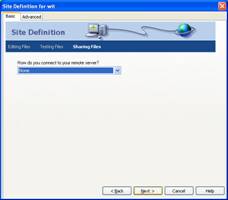 |
| And this time select FTP from the drop down box | 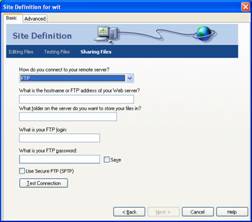 |
Enter in your details- you can leave the second box “what folder on the server do you want to store your files in?” blank
Then click the Test Connection button to see if it works if it comes back with a message connected successfully then click Next and carry on as normal.
Now your FTP connection is setup.
Uploading files
When your site is finished ad you want to upload to your web host click the connect button on the files panel
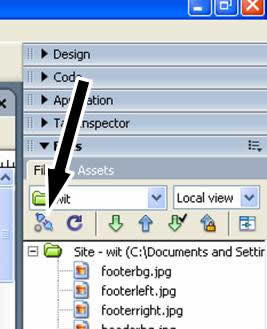
Then click the Expand/Collapse button
And depending on your server and if you have already uploaded any files you should see something similar to below
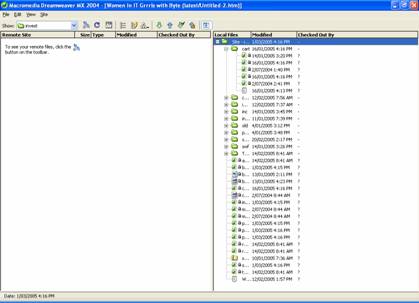
Now all you need to do is drag your files from the right pane and drop them in the left and they will be transferred to your web host.
Open a browser window and type in your web address and check your site!!
Appendix
Shortcut Keys